A “Rachel Sandwich”: A Funky Creation Inspired by a Food Truck Sensation!

DSCN2694

So I had to title this a “Rachel Sandwich” because that saying has been a staple in my group’s vocabulary since all of my little “brothers” were in high school….so almost 10 years!! Back in the old days, when I had 1-7 teenage boys traipsing through my kitchen after they got out of school, I made a lot of sandwiches, because they are quick and easy. But because I am who I am, they were not just simple meat and cheese, no, there were sweet peppers and garlic in the mayo and sauteed onions and broiled peppery tomatoes on top!! Hence making a “Rachel Sandwich” a special treat all on it’s own!

The inspiration for this particular sandwich occurred at the end of May, when I accompanied my Aunt to the Creedence Clearwater Revival concert at the beautiful Hudson Gardens. Even if you have never heard the name CCR, they sing such classics as Bad Moon Rising, I Put A Spell On You, Run Through The Jungle, and Who’ll Stop The Rain. I am absolutely sure you have heard at least one of their songs in your lifetime! Even if you have seen Hocus Pocus, then you have heard Bette Midler cover I Put A Spell On You, hahaha! Anyway, awesome show!! They can still rock it!

0531151734a 0531151958

Now they had about six food trucks at this concert, and I started off the night with some seriously delicious salted caramel sweet potato fries, but I was having a hard time choosing the main dish. Although the Filipino food truck really had me gunning for some authentic Pansit, it was a different truck that eventually caught my eye with its delightfully clever dish names! “Not Your Mama’s PB & J!” Say what?? Seared pork belly topped with a Thai peanut slaw and a smear of jalapeno jelly! Count me in!

0531151750

Salted Caramel Sweet Potato Fries

0531151852

Not Your Mama’s PB & J

Unfortunately, it turns out that I don’t like pork belly!! (Sorry BFF-brother-in-law!! Although, I feel like you just said that you loved pork belly just so Desiree and I would try it, lbvs!! Well, I did!) But I absolutely adore the idea! So I had to figure out a way….

Ingredients:

Coleslaw (unprepared, either in a bag, or finely chop both cabbage and carrots)

Thai Peanut Sauce* (either prepared or recipe follows)

Bacon–at least three strips per sandwich

Bread

1 jar Jalapeno Jelly

1 cup Brown Sugar

*Thai Peanut Sauce (Remember that my recipes are approximate):

3/4 cup peanut butter (I used 1/2 creamy, 1/4 chunky)

1/4 cup water

3 Tablespoons hoisin sauce

2 Tablespoons lime juice

2 Tablespoons soy sauce

1 Tablespoon granulated sugar

2 1/2 teaspoons chile-garlic paste

1-2 cloves of garlic finely diced or mashed (I kept mine kind of chunky, but I love raw garlic)

1/2 teaspoon toasted sesame oil (I used a ginger and soy sauce sesame oil)

Directions:

Prepare your Thai Peanut Sauce by combining all of the ingredients and whisking them thoroughly.

DSCN2492 DSCN2561 DSCN2566

Prepare your slaw. Whether you are dicing the cabbage and carrots yourself, or simply opening a bag like I did, combine the veggies with the Thai Peanut Slaw, making sure it is thoroughly saturated. Cover, and put in the fridge.

DSCN2573DSCN2574

In a separate bowl, combine about a cup of brown sugar and 2 big dollops of the jalapeno jelly. Mix well and set aside.

DSCN2497 DSCN2498 DSCN2506

Preheat oven to 350-375 degrees F.

Cook your bacon….

A few years ago, a very dear ol’ friend of mine taught me how to make “bacon quilts” for your sandwiches. *Explosion* Mind blown!! Perfect size for the bread and it keeps the bacon together inside! If anyone out there is a BLT fan like me, this method will change your life!!

DSCN2719

First, take your super long bacon strips and cut them in half, like this:

DSCN2508

Toss the half strips in the brown sugar and jelly mixture, making sure that every piece is coated.

DSCN2511 DSCN2512

While they are marinating, spray your shallow baking sheet with non-stick cooking spray. I like to have my bacon elevated from the pan, so I put a cookie rack on top of a baking sheet that has slightly raised sides–this prevents the bacon grease from getting everywhere. Spray the rack too, if you’re using one.

Quilt the bacon! Do you remember those old DIY potholder loom kits? Where you had to weave each band over and under the other bands? Well this is basically the same idea!

funloom

Remember Me??

Start with three pieces, and lay them out side by side (if one end is thicker than the other, then alternate the direction of the pieces so that it is not lopsided).

DSCN2540

In the opposite direction, add a fourth piece so that it lays on top of the outer pieces and under the center piece.

DSCN2543

The fifth piece will be the opposite, under the outer pieces and on top of the center.

DSCN2544 DSCN2545 DSCN2546 DSCN2547

The sixth and final piece will be the opposite of the fifth, the same as the fourth.

DSCN2548 DSCN2549 DSCN2550

TA-DA!!! You just made your first bacon quilt! Repeat the process until you have the desired amount of quilts for your sandwiches.

DSCN2556

Bake your quilts until desired crispness. You can flip them, if you want, but be aware that the jelly/sugar mixture has made them quite sticky and you do run the risk of “fraying” the quilt.

DSCN2689

Once your bacon quilts have reached the desired crisp-ability, it is time to make the ‘wich.

Toast your bread. I used this delightful loaf from Sprouts:

DSCN2633

Smear desired amount of jalapeno jelly on one side of each of the slices of toast. I like the heat, so I used a healthy dose.

Lay your chosen quilt upon a slice of jellied toast.

Top with desired amount of the Thai Peanut Slaw and the other piece of jellied toast.

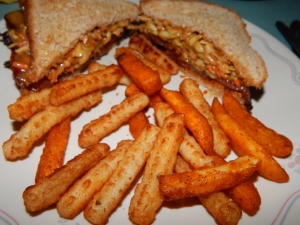
Slice it in half, if you would like, and ENJOY!! I served mine with both Sriracha french fries and regular fries!!

DSCN2694

I definitely preferred the bacon quilt over the pork belly, but I would strongly suggest trying the REAL Not Your Mama’s PB & J, if you ever run across it!!

Cubano Rolls: Tasty Treats Inspired by a Delicious Restaurant Dish!

My Inspiration: Crispy Cuban Rolls from The Cheesecake Factory.

My Inspiration: Crispy Cuban Rolls from The Cheesecake Factory.

The inspiration for this dish came from an appetizer I had at The Cheesecake Factory while out to dinner with the family.  I don’t have a deep fryer so I had to adjust the wrapping.  I used crescent rolls and they worked just fine!

I bought some pre-cooked pork so I wouldn’t have to take the time to cook it.

This was the only pre-cooked pork that looked right and it was quit tasty.

This was the only pre-cooked pork that looked right and it was quit tasty.

I sliced the pork, swiss cheese, ham and pickles into strips to fit easily into the crescent rolls.

The ingredients: pork, swiss cheese, ham, crescent rolls and mustard.

The ingredients: pork, swiss cheese, ham, crescent rolls and mustard.

I stuffed the crescent rolls with my strips of food and added the Dijon mustard.

Stuffed crescent

Stuffed crescents.

The food hung out of the end of the crescents but that just made the cheese all brown, crispy and delicious!  Once the crescents were done I brushed the outsides with more of the Dijon mustard, just a little tip I picked up from Masterchef!

DSC00577

Looks Yummy!

Looks Yummy!

I made these twice, once for dinner and once as an appetizer for a cocktail party.  Lets just say that the appetizers were gone in about fifteen minutes!  They look tasty but they taste even better!

Sugar and Spice Chicken over Rice!!

0609152049a

So yesterday evening, I got a wild hair and decided to combine two different recipes to make my own. Referencing the “Sweet, Sticky and Spicy Chicken” from allrecipes.com and a Thai Sweet Chili Dipping Sauce I found on buzzfeed.com, I created my own sweet and spicy Asian inspired chicken. I couldn’t really decide on a name, so I was asking my buds what I should call it, and I have to mention my BFF’s idea: “Dr. Cock Sauce Chicken.” I know, I know, what a weird name! It’s super hilarious though, because one of the ingredients is Dr. Pepper—hence the Dr.—another ingredient is Sriracha chili sauce—affectionately known as Cock Sauce in our neck of the woods, both for the fact that it has a rooster on the bottle, and for the double entendre, haha. So sorry if it offends! I was also considering “Everything but the Kitchen Sink Chicken”—which will be completely understandable when you look at the ingredients, hahaha!
Okay, let me tell you right away that I am horrible at following exact measurements in recipes, which is probably why I am not a strong baker! So every recipe I include on this blog will have approximate values. If you are a stickler for proper measurements, then my recipes are not for you! Otherwise, if you just like throwing random stuff together to see what you get, come to me and I can probably tell you if the concoction works! Also, my meals can be rather time consuming. I am not a professional, I have just been in charge of the meals in my household for a long time. I still make mistakes, and I know I am not always doing the right things the right way—I would fail all of those Food Network challenges with time limits and technique evaluations—but I love to experiment, and my family indulges me!

Ingredients (Approximate):
1 lb of chicken (I used one very large chicken breast) cut into chunks
1 can of Cherry Dr. Pepper (any cola or Dr. Pepper-ish soda)
1 cup of Soy Sauce
1-2 tablespoons of butter/margarine
½-1 ½ tablespoons of coconut oil
1 tablespoon of honey
½ cup of brown sugar
1 tablespoon Cornstarch
¼ cup Cold Water (for cornstarch)
Sriracha
Chili Paste
Diced Roasted Garlic (or fresh, or dried)
3-4 Mini Sweet Peppers, different colors, diced
½ white, red, yellow, or sweet onion (I used yellow), diced
1 can of sliced mushrooms
1 can of whole water chestnuts
Garlic Salt
Pepper (I used fresh ground peppercorn medley)
Ground Ginger (could also use freshly minced ginger root)
Rice
Frozen Eggrolls

Step 1: Create a marinade for your chicken using the soda and some soy sauce—just enough to cover the pieces. Soak for as long as you can. (I cut my chicken first, and it was still a little frozen. So while I started on the other stuff, my chicken was marinating and defrosting).

DSCN1595
Step 2: Melt the butter on low in a large-ish sauce pan. Add the onions, peppers, and garlic. “Sweat” these ingredients for about two minutes, stirring frequently. (Thank you Bobby Flay for that description! Basically, from what I understand, sweating onions and peppers and the like, simply means sautéing them in butter, on low heat. This kind of causes the flavors to “sweat out” into the butter—thus intensifying and concentrating the flavors).

DSCN1610DSCN1612
Step 3: Drain the mushrooms and add them to the melty butter goodness. I added the garlic salt at this point, because mushrooms need some added flavor! Cook for another couple of minutes to really infuse the mushrooms.

DSCN1616
Step 4: Using a colander, strain the peppers, mushrooms, garlic, and onions—capturing the infused butter in a separate bowl. Set the veggies aside and poor the butter back into the pan. Add the coconut oil. Once it is hot enough (it will pop a little, so be careful), add your chicken pieces. Try not to get very much of the marinade into the pan—we don’t want to mess with the butter too much. Add the pepper and ginger.

DSCN1617
Step 5: Once the chicken has been browned (cooked mostly), add the brown sugar and the chili paste, then drain the water chestnuts and quarter them into the chicken. Make sure that the sugar has melted completely before moving on to step 6.

DSCN1619DSCN1620
Step 6: Hopefully you kept your bowl from the butter straining, because we are using it again. I recently had an escapade with a new recipe, and I completely overcooked the chicken! Ruined the otherwise delightful meal. So this time, I poured my chicken (on top of the veggies) through the colander again. Set them aside, and pour the buttery sugar sauce back into the pan.
Step 7: To try and optimize my flavors, I made a little reduction sauce. Taking the buttery sugar sauce, I added cherry Dr. Pepper and the Sriracha (very spicy, so add the amount you desire). On the medium side of Med-Hi setting, bring to a boil and let the sauce go for about 5-10 minutes. Stir frequently. Add the honey, and then some soy sauce (I used about 3 tablespoons for this part). The reason why I wait to add the soy sauce is because it is already supremely salty, and I don’t want it to be reduced very much. While it is still bubbly, mix your cornstarch with cold water. Gently pour into the sauce mix and stir briskly using a whisk. Let it heat for just a little, while continuing to stir. You should be able to feel it thickening up. Add more cornstarch if you want the sauce thicker, more soda or soy sauce if you got it too thick.
During this time, I made my rice (I cannot make rice to save my life, so we use Minute rice. If you want the good stuff, then start it probably around step 4) and, after pre-warming them in the microwave, popped my eggrolls into the oven to crisp the outside at 400°F.
Step 8: Once you have achieved your desired thickness, add the meat and veggies to it, and simmer on low.

DSCN1633DSCN1631
Step 9: Once everything is all warmed up, done, and at your desired crispness, it is time to plate. Start with the rice, making a little divot for the saucy chicken (like mashed potatoes!), pour the saucy chicken over the rice, and dip your eggroll into the sauce too!!

DSCN1638
Thanks! Hope you like it!